Refactoring changes the way our code is structured internally. The output to the console window will still look the same. To someone who can't see the code, they won't know we've updated it; we are modifying the internal structure without changing the external behavior.
More About Refactoring
Refactoring is a big topic. It is especially important for large projects. Our project is small and our level of refactoring is light, but you should start learning about, and practicing, it.
Book recommendation: Clean Code: A Handbook of Agile Software Craftsmanship by Robert C. Martin.
We've put all of our code in the Main() function to start because we were focusing on creating simple statements. It isn't a good practice to keep most of your code in Main(), though.
Let's move our existing code to our new Game class.
The three primary concepts in our current code are:
-
- An attribute, CharacterName.
- Statements to print out the game's title and welcome message. This group of statements can be labeled as StartGame.
- Statements that ask the player to type in a name, and saves that input as CharacterName. These statements, with the goal of naming a character, can be grouped and labeled NameCharacter.
Game Class Diagram Update
These changes visualized in UML:
| Game |
|---|
| CharacterName: string |
| StartGame() NameCharacter() |
-
-
- The top section has the class name: Game.
- The middle section holds the attributes. Right now we have one: CharacterName.
- The bottom section shows two operations: StartGame and NameCharacter.
-
Game Class Update
To translate this to code, we can indicate with comments where in the Game class we will be moving our statements. For each of the three concepts, add a comment.
Example:
public static class Game
{
   //character name

   //print out game title and overview

   //ask player for a name, and save it
}
Move the statement that declares our CharacterName to the Game class and make it static. Game needs to be static because we won't be creating an instance of it. To mark it as static, just add the keyword.
Example:
public static class Game
{
   //character name
   static string CharacterName = "John Doe";

   //print out game title and overview


   //ask player for a name, and save it

}
Creating a Method
Next we'll create two methods, StartGame and NameCharacter, and move the rest of the statements we've added to them.
Methods of a class are the things that the class can do (verbs). Methods are also sometimes called functions or operations.
Function: A collection of statements that is defined once, and can be used multiple times. It can optionally take arguments that may change how the function runs. The term function is used in many programming languages.
Method: A function of a class; often used in object-oriented languages to describe functions that are defined as part of a class.
Operation: this term is usually used in UML diagrams (instead of function or method) to describe what a class can do.
Our first method will hold the statements that print out the game title and the overview or welcoming message that you've written for your game. The basic form of our method will look like this:
public static void StartGame()
{
     //statements
}
Identifier
In our method declaration we have three keywords, and an identifier.

An identifier is a name that a programmer thinks up for something they create in their application.
More About Identifiers
Suggestions for beginning programmers:
-
-
- Don't use a keyword as an identifier.
- Start your identifier with a letter or an underscore.
- Keep your identifier as one word, no spaces.
-
If you want to use more than one word, you can connect them by capitalizing the first letter of each word, or with underscores. Here are some examples of valid identifiers: CharacterName, characterName, Character_Name or _CharacterName.

When you declare a variable name in an IDE like Visual Studio, it will usually tell you whether or not it is valid. In Visual Studio you'll see a red squiggle indicating an error when naming.
A general guideline for naming your identifiers is to have the name be meaningful. If someone else looks at your code, it is ideal if it is immediately apparent what the identifier is for.
A variable named "CharacterName" can easily be understood as holding a character's name. If you named the variable "plchna" it would be more difficult to understand what the purpose is just by looking at the name. You might understand "plchna" as short for PLayer CHaracter NAme, but others might not.
Even if you are working alone on a project, try to make your names meaningful. You might show your code to a potential employer, use it as part of another project, open source it, or share it in another way.
Keywords
A keyword is something that has special meaning in the language.

The three keywords in our method declaration are of two types: access modifiers, and a return value.
More About Keywords
"Keywords are predefined, reserved identifiers that have special meanings to the compiler. They cannot be used as identifiers in your program unless they include @ as a prefix." (MSDN)
Access Modifiers
Access modifiers indicate how something can be used or referenced.
The first in this case, public, allows other elements to call this method freely.
The next keyword is static. This will allow the method to be used without creating an instance of the class first. This might be a confusing concept, but don't worry too much about it now. We'll come back to instances when we build out our item class.
More About Access
Access determines whether member variables or methods can be seen or used. When you are more comfortable programming in C# you will want to start making parts of your code private.
-
-
- public: Visible to any method of any class
- private: Accessible only to members of the same class
-
Return Values
The third keyword in our method declaration is void. This means that this method will not return a value.
Adding Methods
Add StartGame to your Game class, and move statements to it. The statements that we'll include inside the method are the ones that print out the title and overview/message inside the method's code block. Your Game class should look something like:
public static class Game
{
   //character name
   static string CharacterName = "John Doe";

   //print out game title and overview
   public static void StartGame()
        {
            //(the next few lines will have your own content)
            Console.WriteLine("Game Title");
            Console.WriteLine("Welcome to ...");
        }

   //ask player for a name, and save it

}
Now we can make another function to handle saving the name a player enters. This method will also be static with void as the return type. Create the method and move the appropriate statements.
Example:
static void NameCharacter()
        {
            Console.WriteLine("What would you like your character's name to be?");
            CharacterName = Console.ReadLine();

            Console.WriteLine("Great! Your character is now named " + CharacterName);
        }
Calling Methods
To run our NameCharacter method we need to call or invoke it. This is done by typing the name of the method with a set of parenthesis. Some methods also require additional data to be passed inside the parentheses (as arguments), but ours don't.
Because the methods are in the same scope, we don't need to add a reference to the class or identifier.
NameCharacter();
Add a statement to invoke your NameCharacter method. The statement should be at the end of the StartGame method's code block.
Example:
   public static void StartGame()
        {
            Console.WriteLine("Game Title");
            Console.WriteLine("Welcome to ...");
            NameCharacter();
        }
Calling StartGame() from Main()
Last, we need to invoke our StartGame method from Main. Main is not in the same class definition as our methods. If the method wasn't static we would need to create an instance before we could call it; since it is static, we can use the name of the class, a dot (dot notation) and the name of the method: Game.StartGame(). Add a statement to the Main method to call StartGame.
Example:
        static void Main()
        {
            Game.StartGame();
            Console.ReadKey();
        }
Program Flow
Can you predict how the program will flow?
-
-
- Main: Calls Game.StartGame() -> flow moves to the StartGame method.
- StartGame: Text is printed to the console window with our Console.WriteLine statements, then NameCharacter is called -> flow moves to the NameCharacter method.
- NameCharacter: Text is printed to the screen, flow pauses waiting for player input (which is saved as CharacterName), and text is printed to the screen again -> flow passes back to Main.
- Main: Flow pauses at Console.ReadKey waiting for player input -> on enter application exits.
-
Stepping Through Code
You can watch the flow of the program by stepping through your code in Visual Studio. Press the F11 key to start (or use the menu option Debug > Step Into).
Follow the yellow arrow and highlighted statements. Main is the entry point in our application.

When Main runs, it will call the StartGame method of our Game class which will print out the game title and welcome/overview message.
Then the NameCharacter method is invoked which will ask the player to type in a name, and the name is saved as a string value with the identifier CharacterName.
You can see when variable values change, and track whether they are storing the data you expected.

After the method CharacterName runs, the application returns to Main() and the Console.Read() statement waits for input (keeping the application window open).
If you don't have Visual Studio you can see an animation that shows Visual Studio stepping through our code (≈253kb).
Save and test your code to make sure there are no errors. If you have errors, compare your code to the example in the Updated Code section below.
When you run your application you might notice that it looks the same as the previous version. We've moved a lot of code around, but the output is the same. Even though the output looks the same, our code is much more organized now and is leveraging C#'s OOP capabilities.
More About Object Oriented Programming (OOP)
To become comfortable with the C# language you should understand how objects work. C# is inherently Object-oriented (OO). Even in a simple Hello World application you have a class (Program) with a method (Main()).
If you are creating an application that is small, or one that you won't be iterating on, you might not need to make custom classes and/or instantiate objects. Until you feel like you really know the language, however, keep practicing with OO.
If you understand how C# is object oriented, it is easier to build upon the basics. You can look up a class and see what properties and methods it has, and know whether you need to instantiate an object, or whether it is static and you can access members via the class name.
Functions defined as part of a C# class are called what?
System is a
Method Arguments and Return Values
As you've seen, methods are great ways of packaging statements. Define a method once, and then call it whenever you need that functionality. They help streamline your code and make it easier for you to update later; instead of looking for the statements in many places, you only need to update the method.
We discussed method arguments and return values earlier. Let's look at them in more depth.
- Arguments: Arguments are values that are passed into a function, and may change how a function operates. They are also sometimes called parameters.
- Return Value: The return value is a value that is passed back after the method (function) runs.
The method below, NameCharacter, has void as the return value. That means that when it runs, there will be nothing returned.
It also takes no arguments. When we call this function, we won't include any information inside the parenthesis.
static void NameCharacter()
{
        Console.Write("What name do you go by? ");

        CharacterName = Console.ReadLine();
        Console.WriteLine("Welcome, " + CharacterName + ", and good luck!\n\n");
}
Calling the method:
NameCharacter();
The terms parameter and argument are often both used to refer to the data inside parentheses when a function is called or invoked.
However, many programmers use the terms for two similar, but fundamentally different aspects. The values being passed in are arguments, and the values used within the function are parameters.
Example:
 public static int Score(int points, int bonus)
{
        return points + bonus;
}
Inside the method's declaration, the values are called parameters.
The values passed in when the method is invoked would be termed arguments:
Score(36, 5);
A method has parameters, and takes arguments.
Argument Example
Let's create an example of passing an argument into a method. If we want to change the color of text when certain characters talk, for example, we could make a function that accepts a message and writes it to the console window.
static void Dialog(string message)
{
     Console.ForegroundColor = ConsoleColor.Cyan;
     Console.Write(message);
     Console.ResetColor();
}
To use this function, we'll pass in what we want to be printed out. Example usage:
Console.Write("A stranger approaches. Clearing their throat to get your attention, they ask \n");
Dialog("Have you seen a strange creature around here?\nAbout three feet high, greenish, with fluffy hair?\n");
Console.Write("How do you answer? 1) Yes, 2) No, 3) Repeat the question, 4) Keep walking");

Write vs. WriteLine
Write and WriteLine are both overloaded methods with several forms. The Write(String) form writes the string value to the standard output stream.
Console.Write("Hello");
WriteLine(String) is similar, except that after writing the string value it also writes a line terminator.
Console.WriteLine("Hello");
If you use Write and want a line terminator you can use the escape sequence for a new line (\n).
This short example program shows both Write and WriteLine examples:
using System;

namespace Write_WriteLine
{
    class Program
    {
        static void Main()
        {
            Console.Title = "Write and WriteLine examples";
            Console.ForegroundColor = ConsoleColor.Cyan;
            Console.Write("Write example 01");
            Console.ForegroundColor = ConsoleColor.Yellow;
            Console.WriteLine("WriteLine example 02");
            Console.ForegroundColor = ConsoleColor.Green;
            Console.Write("Write example 03");
            Console.ForegroundColor = ConsoleColor.White;
            Console.Write("Write example 04");
            Console.ForegroundColor = ConsoleColor.Magenta;
            Console.WriteLine("WriteLine example 05");
            Console.ForegroundColor = ConsoleColor.Red;
            Console.WriteLine("WriteLine example 06");

            Console.Read();
        }
    }
}

Method Overload
Challenge: can you make another Dialog method definition that takes two arguments? One for the message, and one that would change the color of the text to be written to the console window.
Take a few moments to create your own before looking at an answer below.
Modified Dialog
There are several ways in which to solve this challenge. Here is one option:
//original Dialog method
static void Dialog(string message)
{
    Console.ForegroundColor = ConsoleColor.Cyan;
    Console.WriteLine(message);
    Console.ResetColor();
}

//new method
static void Dialog(string message, string color)
{
    if (color== "red")
    { Console.ForegroundColor = ConsoleColor.Red; }
    else if (color == "green")
    { Console.ForegroundColor = ConsoleColor.Green; }
    else if (color == "yellow")
    { Console.ForegroundColor = ConsoleColor.Yellow; }
    else
    { Console.ForegroundColor = ConsoleColor.White; }

    Console.WriteLine(message);
    Console.ResetColor();
}
To call the method:
Dialog("One argument version");
Dialog("Two argument version with green", "green");
Dialog("Two argument version with yellow", "yellow");
The Dialog method is now overloaded; there is more than one way in which the method can be called.

Return Value
If your method has a return value other than void, you need to have a statement inside the code block with the keyword return, and the value you want to return.
return totalSum;
You can return a value even if you don't pass in arguments. For example, a method that utilizes properties of a class or other data to determine a value wouldn't need arguments passed in.
The code below shows a scenario in which arguments aren't needed. A property of the Character class stores a number. A random number is compared to the stored value. If the stored value is greater than or equal to the random number, the result is true. Otherwise it is false.
A narrative for this situation could be that as a player travels through the game there are opportunities for them to increase their "luck". The higher their luck, the better their chance is against "karma". A for loop is used in the example code below so you can see results that are both true and false.
Return Value Example
using System;

namespace ReturnValue
{
    class Character
    {
        static int luck = 5;
        static Random randomNumber = new Random();
        public static int points = 0;

        public static bool Luck()
        {

            int karma = randomNumber.Next(10);
            bool result = false;

            if (luck>=karma)
            { result = true; }

            return result;
        }
    }
    class Program
    {
        static void Main()
        {
            Console.Title = "Return Value Example";
            Console.WriteLine("Your points: " + Character.points);
            for(int i=0;i<20;i++)
            {

            if (Character.Luck())
            {
                Console.WriteLine("Your luck has gained you another point!");
                Character.points++;
            }
            else
            {
                Console.WriteLine("Your luck has failed.... you've lost a point.");
                Character.points--;
            }
            }
            Console.WriteLine("Your points: " + Character.points);
            Console.Read();
        }
    }
}

Arguments and Return Value Example
Below is a method that takes two arguments (two integers) and returns the sum (also an integer).
//method declaration to add numbers together
 public static int Add(int num1, int num2)
{
        return num1 + num2;
}
To Do: Improve the Interface
Practice what you've learned, and gain new knowledge about how to use design elements and color in your game.
Assignments
-
-
- Read about and practice changing color properties. Walk through: Console Application Color: Text and Background.
- Add design elements to your Adventure Game with ASCII art and color properties. Walk through: Console Application ASCII Design. Consider having a "title screen" that displays the title and asks the player to press enter to start the game.
-
Consider using Console.Clear() to clear the screen. This helps separate parts of a text-heavy game (such as between levels, chapters, achievements, or when a player clicks enter at a title screen).
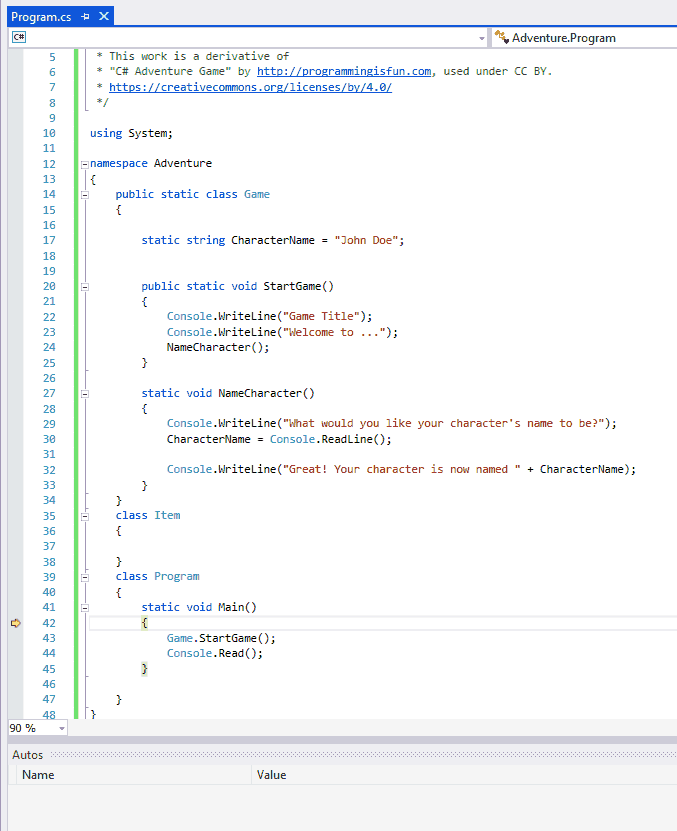
Code Progress Example
Your code should look similar to the example below (with your own content though!):
/*
 * [Your Title]
 * by Your Name, Date
 *
 * This work is a derivative of
 * "C# Adventure Game" by http://programmingisfun.com, used under CC BY.
 * https://creativecommons.org/licenses/by/4.0/
 */

using System;

namespace Adventure
{
    public static class Game
    {

        static string CharacterName = "John Doe";


        public static void StartGame()
        {
            Console.WriteLine("Game Title");
            Console.WriteLine("Welcome to ...");
            NameCharacter();
        }

        static void NameCharacter()
        {
            Console.WriteLine("What would you like your character's name to be?");
            CharacterName = Console.ReadLine();

            Console.WriteLine("Great! Your character is now named " + CharacterName);
        }
    }
    class Item
    {

    }
    class Program
    {
        static void Main()
        {
            Game.StartGame();
            Console.Read();
        }

    }
}
Code Files
If you have errors, or just want to check how your code compares in terms of progress, the code examples for this chapter are linked below.
Next Step
In the next section we will discuss conditional statements. Conditionals can allow the player to choose their own path through your game.